OTRS Installation!!!
Key features:
- Adding a note to the logged ticket.
- Assigning/modifying priority for your logged ticket.
- Escalating tickets.
- Statistics of the tool.
- Excellent GUI
Operating system : Oracle linux (recommended due to its less dependencies)
IP ADDRESS : 192.168.247.131
SERVER NAME : server.root.local
PRE-INSTALLATION TASKS:
1. Add Host ip address in /etc/hosts
2. Install epel repo.
3. Install required packages.
1.ADDING HOST IP ADDRESS:
You must be "root" for executing these commands.
Open /etc/hosts
#vi /etc/hosts
add the following line
192.168.247.131 server.root.local server
Save the file.
Now Restart the machine.
2. INSTALL EPEL REPO:
1. Click here to download the epel repo, Open with Installer and install the package.
2. If you fail to install the package through the above step, execute the below lines.
#cd /etc
#wget http://epel.mirror.net.in/epel/6/i386/epel-release-6-8.noarch.rpm
#rpm -Uvh epel-release-6-8.noarch.rpm
#yum install bugzilla
#yum install --disablerepo="*" --enablerepo=epel bugzilla
3.INSTALL REQUIRED PACKAGES:
Login as root.
#yum install mysql-server
#yum install mysql-server (Pres 'Y' if prompted in the process)
#service mysqld start
#chkconfig mysqld on
#mysql_secure_installation
( in the process you will be prompted for "Y/N" always press "Y")
Enter the root password on prompt
New password: -----> Enter the new password
Re-enter new password: -----> Enter password again
New password: -----> Enter the new password
Re-enter new password: -----> Enter password again
Password updated successfully! Reloading privilege tables..
... Success!
... Success!
Tip:To save the file anywhere mentioned in this Post
1.Press "esc"
2.Type :wq!
3.Press Enter
#vi /etc/my.cnf
Add the following lines under mysqld section
max_allowed_packet=20M
innodb_buffer_pool_size=4G
query_cache_size=32M
innodb_log_file_size=1G
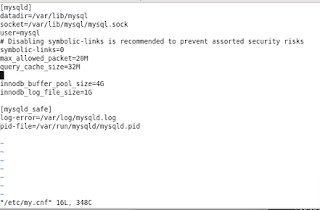
Save the file.
Now restart Mysql server Using the below command:
#service mysqld restart
Now install "httpd" service:
#yum install httpd
#service httpd start
#chkconfig httpd on
Now Edit file /etc/httpd/conf/httpd.conf using below command:
To avoid any mis configuration issues copy the conf file to conf.bak with below commands.
#cp /etc/httpd/conf/httpd.conf /etc/httpd/conf/httpd.conf.bak
#vi /etc/httpd/conf/httpd.conf
In the file make the changes as below.
Tip: You can search in linux by using "/"
To search for "server" use "/server" in the file without pressing "insert button".
ServeAdmin root@server.local
ServerName 192.168.247.131:80
Listen 192.168.247.131:81
o Crypt::Eksblowfish::Bcrypt.......ok (v0.009)
1.Press "esc"
2.Type :wq!
3.Press Enter
Edit the file /etc/my.cnf
#vi /etc/my.cnf
Add the following lines under mysqld section
max_allowed_packet=20M
innodb_buffer_pool_size=4G
query_cache_size=32M
innodb_log_file_size=1G

Save the file.
Now restart Mysql server Using the below command:
#service mysqld restart
Now install "httpd" service:
#yum install httpd
#service httpd start
#chkconfig httpd on
Now Edit file /etc/httpd/conf/httpd.conf using below command:
To avoid any mis configuration issues copy the conf file to conf.bak with below commands.
#cp /etc/httpd/conf/httpd.conf /etc/httpd/conf/httpd.conf.bak
#vi /etc/httpd/conf/httpd.conf
In the file make the changes as below.
Tip: You can search in linux by using "/"
To search for "server" use "/server" in the file without pressing "insert button".
ServeAdmin root@server.local
ServerName 192.168.247.131:80
Listen 192.168.247.131:81
Now restart the httpd service.
#service httpd restart
Now Edit file /etc/sysconfig/iptables
#vi /etc/sysconfig/iptables
add the followng line:
-A INPUT -p tcp -m state --state NEW -m tcp --dport 80 -j ACCEPT
Save the file.
Now restart the IP tables with below command:
#service ip tables restart
Now edit the Selinux file:
#vi /etc/sysconfig/selinux
Set the value of selinux to disabled
Selinux=disabled
save the file and Reboot system
#yum install otrs-3.3.6-01.noarch.rpm
Now test whether all the modules were installed correctly or not.
#/opt/otrs/bin/otrs.CheckModules.pl
#service httpd restart
Now Edit file /etc/sysconfig/iptables
#vi /etc/sysconfig/iptables
add the followng line:
-A INPUT -p tcp -m state --state NEW -m tcp --dport 80 -j ACCEPT
Save the file.
Now restart the IP tables with below command:
#service ip tables restart
Now edit the Selinux file:
#vi /etc/sysconfig/selinux
Set the value of selinux to disabled
Selinux=disabled
save the file and Reboot system
DOWNLOADING OTRS
You can download from official site for newer versions. Click Here for official site
To download & install follow the commands below.
#wget https://www.otrs.com/download-thank-you/thank-you-downloading-otrs-software/?download=/RPMS/rhel/7/otrs-4.0.9-02.noarch.rpm
#yum install otrs-3.3.6-01.noarch.rpm
The above commands will install OTRS into your system.
Now restart the httpd service.
#service httpd restart
To install the missing packages in the OTRS execute the following commands.
#yum install "perl(DBD::ODBC)" "perl(DBD::Oracle)" "perl(DBD::Pg)" "perl(Encode::HanExtra)" "perl(GD)" "perl(GD::Text)" "perl(GD::Graph)" "perl(JSON::XS)" "perl(Mail::IMAPClient)" "perl(PDF::API2)" "perl(Text::CSV_XS)" "perl(YAML::XS)"
Now test whether all the modules were installed correctly or not.
#/opt/otrs/bin/otrs.CheckModules.pl
You will find the output like this.
o Crypt::Eksblowfish::Bcrypt.......ok (v0.009)
o Crypt::SSLeay....................ok (v0.57)
o Date::Format.....................ok (v2.22)
o DBI..............................ok (v1.609)
o DBD::mysql.......................ok (v4.013)
o DBD::ODBC........................ok (v1.48)
o DBD::Oracle......................Not installed! (optional - Required to connect to a Oracle database.)
o DBD::Pg..........................ok (v2.15.1)
o Encode::HanExtra.................ok (v0.23)
o GD...............................ok (v2.44)
o GD::Text.......................ok (v0.86)
o GD::Graph......................ok (v1.44)
o IO::Socket::SSL..................ok (v1.31)
o JSON::XS.........................ok (v2.27)
o List::Util::XS...................ok (v1.21)
o LWP::UserAgent...................ok (v6.05)
o Mail::IMAPClient.................ok (v3.34)
o IO::Socket::SSL................ok (v1.31)
o ModPerl::Util....................ok (v2.000004)
o Net::DNS.........................ok (v0.65)
o Net::LDAP........................ok (v0.40)
o Net::SSL.........................ok (v2.84)
o PDF::API2........................ok (v2.019)
o Compress::Zlib.................ok (v2.021)
o Text::CSV_XS.....................ok (v0.85)
o Time::HiRes......................ok (v1.9721)
o XML::Parser......................ok (v2.36)
o YAML::XS.........................ok (v0.38)
Now you are all set to go. Open the browser and type http://ip-address/otrs/installer.pl
http://192.168.247.131/otrs/installer.pl
1.Click next
2.Accept the license agreement
3.Select mysql --> install type create new database for OTRS.
4.Enter the Mysql root username and password and click on check database settings.
5.if the database settings were found correct the new database is created. click Next
6.Click Next
7.In the 3rd windows give your desired details in system FQDN, email and organization. Keep others as it is.
8.Click Next.
9.Give your mail server details in the next window if you have them, you faced any error we will discuss about it in the next Post. :)
10.Click on skip this step.
11.WELCOME TO OTRS. :)
To access OTRS:
Http://Ip-address/otrs/index.pl
To access OTRS:
Http://Ip-address/otrs/index.pl


Comments
Post a Comment